Pages

Thursday, April 30, 2020

It's a Good Day Card by Tatiana Trafimovich

It's a Good Day Card by Tatiana Trafimovich | Woodland Picnic Stamp Set, Forest Scene Builder Die Set, Land Borders Die Set and Sunscape Stencil by Newton's Nook Designs #newtonsnook #handmade

It's a Good Day!

Today Tatiana has created a charming picnic scene using the cute critters from our Woodland Picnic Stamp Set. She colored the deer with the picnic basket and the cute squirrel with an apple using copic markers and added little accents with a white gel pen. The critters were cut out using the coordinating Woodland Picnic Die Set.

In the background she created a fun woodsy scene by stenciling the sun ray pattern from our Sunscape Stencil to create a fun two toned sky. Over this she layered some white birch trees, die cut using our Forest Scene Builder die. The whole scene is framed by a circle cut out from a white card front. She also added a line of grass using our Land Borders Die Set and added a bit of dimension to it by coloring it with distress inks! She also added some iridescent sequins for a finishing touch. Those little extra details really make a card feel special!

Along the bottom she stamped the sentiment "It's a good day to have a good day" from the Woodland Picnic Stamp Set. This sentiment is perfect for sending a happy hello to a friend to help them remember to have a good day!

Here's a close up so you can see all the beautiful details:
It's a Good Day Card by Tatiana Trafimovich | Woodland Picnic Stamp Set, Forest Scene Builder Die Set, Land Borders Die Set and Sunscape Stencil by Newton's Nook Designs #newtonsnook #handmade

We hope you having a good day today and are inspired by this lovely card by Tatiana today! If you like this project you can see more of Tatiana's work over on her blog, Tatiana Craft and Art.


Wednesday, April 29, 2020

Miss You Card by Nakaba Rager

Miss You Card by Nakaba Rager | Newton Loves Boxes Stamp Set, Stowaway Newton Stamp Set and Furr-ever Friends Stamp Set by Newton's Nook Designs #newtonsnook #handmade

Miss You!

This sweet card by Naki features kitties stuck in boxes, just like many of us are stuck in our houses right now! It would be the perfect for sending to someone who you miss to let them know you are thinking of them. She created this sweet card using the kitties in boxes from our Newton Loves Boxes Stamp Set. She colored the images using soft pencil colors and then cut them out using the coordinating Newton Loves Boxes Die Set

For that gorgeous heart background she repeatedly stamped hearts using the little bold hearts from our Furr-ever Friends Stamp Set in a rainbow of colors, leaving an opening in the upper left corner for the sentiment. She added some shimmer spray over the whole background to add a bit of sparkle. 

To finish this adorable card, she embossed the sentiment using our Stowaway Newton Stamp Set.

Miss You Card by Nakaba Rager | Newton Loves Boxes Stamp Set, Stowaway Newton Stamp Set and Furr-ever Friends Stamp Set by Newton's Nook Designs #newtonsnook #handmade

We hope this card by Naki has inspired you to create a card to send to someone you miss!
If you like this project you can see more of Naki's work over on her blog, Notes from Naki. Stop by and say hello!


Tuesday, April 28, 2020

My Heart Smiles Card by Zsofia Molnar

My Heart Smiles Card by Zsofia Molnar | Loads of Blooms Stamp Set, Sky Scene Builder Die Set, Fence Die Set, Land Borders Die Set and Frames & Flags Die Set by Newton's Nook Designs #newtonsnook #handmade

Send a Cheerful Smile!

Today we are sharing a vibrant and uplifting Spring card by Zsofia! She features the image of the girl riding her bike with a huge load of flowers from our Loads of Blooms Stamp Set. This image is so perfect for sending a cheerful greeting! She colored the image using gorgeous bright pastels and also colored a couple of extra little individual blooms. The images were cut out using the coordinating Loads of Blooms Die Set. She then created a fun little scene by cutting out a stitched rectangle from teal paper using our Frames & Flags Die Set for the sky. Over this she layered clouds cut out with our Sky Scene Builder Die Set, a fence cut out with our Fence Die Set and grass, cut out with our Land Borders Die Set.

The sentiment, also from the Loads of Blooms Stamp Set was stamped in pink on a circle that was cut out using our Frames Squared Die Set. She layered that on top and added the cute extra flowers to embellish it! A plaid background paper in bright colors completes the fun!

This cheerful scene is sure to brighten your day!

Here is a close-up \ so you can see the lovely coloring details and gloss:
My Heart Smiles Card by Zsofia Molnar | Loads of Blooms Stamp Set, Sky Scene Builder Die Set, Fence Die Set, Land Borders Die Set and Frames & Flags Die Set by Newton's Nook Designs #newtonsnook #handmade

Thank you, Zsofia, for the gorgeous Spring card today! You can find more of Zsofia's lovely creations and say hello to her over at her blog, Safsafdesign.


Monday, April 27, 2020

Reach for the Stars Card by April Guest Designer Jennifer Hartsgrove


Hello Krafty Friends! I’m back as April’s Guest Designer for Newton’s Nook Designs. In this weeks card, Newton is looking through his telescope and sees a shooting star. I used the Cosmic Newton Stamp Set to make a cute slider card, I have many more ideas with this set in mind!

Reach for the Stars Card by April Guest Designer Jennifer Hartsgrove | Cosmic Newton Stamp Set and Framework Die Set by Newton's Nook Designs #newtonsnook #handmade
Working out the logistics of this slider card, was both exciting and a little frustrating. But…this months theme has been thinking outside of my box, I can’t get “outside” of my house, so I guess I should step outside of my box!

Reach for the Stars Card by April Guest Designer Jennifer Hartsgrove | Cosmic Newton Stamp Set and Framework Die Set by Newton's Nook Designs #newtonsnook #handmade
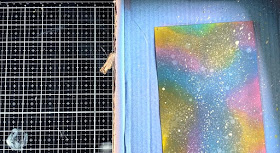
I started my project making my background. I wanted a pretty galaxy sky, I used Distress Oxide Inks to achieve my goal. I did make two large backgrounds so I could get four card panels out of them. On the first one I used Mustard Seed, Picked Raspberry, Squeezed Lemonade, Seedless Preserves, Twisted Citron, Salty Ocean, Mermaid Lagoon, Chipped Sapphire and Black Soot. I first laid down the bright inks, overlapping some to blend in secondary colors. Then I muted them down with Chipped Sapphire and Black Soot to create a nighttime effect. On my second panel I left off a few colors (Squeezed Lemonade, Seedless Preserves, Twisted Citron and Salty Ocean).

Reach for the Stars Card by April Guest Designer Jennifer Hartsgrove | Background for card using Cosmic Newton Stamp Set by Newton's Nook Designs #newtonsnook #handmade

Once the layering of ink was complete I first sprayed the panels with water, to get the oxide reaction. Then I splattered some watered down white and yellow acrylic paints with a little liquid stardust.

Reach for the Stars Card by April Guest Designer Jennifer Hartsgrove | Background for card using Cosmic Newton Stamp Set by Newton's Nook Designs #newtonsnook #handmade
On my second panel I also splatter liquid stardust directly, I loved the effect this gave…its sooo shimmery!

Reach for the Stars Card by April Guest Designer Jennifer Hartsgrove | Background for card using Cosmic Newton Stamp Set by Newton's Nook Designs #newtonsnook #handmade
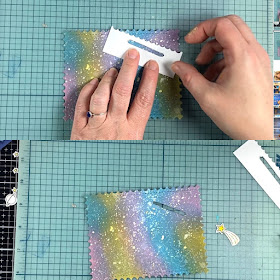
I then decided to cut my background from the largest die in Newton’s Framework set. Next was my challenge. I wanted to create a shooting star, and all the slider card dies I have in my stash were too wide, so I had to be creative and come up with my own template. My first attempt (the second is shown here) didn’t work exactly like I had wanted, so I tried again. This time I did use a slider die, but modified it and made it smaller on a white piece of cardstock. I also decided that a curve wasn’t going to work properly, because I couldn’t get it to slide smoothly. I made my template, then traced it onto my background panel, and used my pen blade to cut it out. Then I used foam tape, and a dime to make my shooting star slide. The dime for the weight, and the foam tape for dimension. I used a triple layer of foam tape all around the edges of the card and some in the middle for stability. This gave the space needed for the star to slide.

Reach for the Stars Card by April Guest Designer Jennifer Hartsgrove | Background for card using Cosmic Newton Stamp Set by Newton's Nook Designs #newtonsnook #handmade
I stamped my images onto a copic friendly cardstock using Lawn Fawn’s Jet Black Ink. Then used the following Copic Markers for my palette:
  • Newton’s Fur: Y35, Y38, YR15 and YR16. Ears: R20. Collar: B04, B06, B00.
  • Telescope: C2, C3, C4, , C5, `C6, and C8.
  • Planets: RV04, RV06, RV09, V12, V15, Y06, B04, and B06.
  • Stars: Y06, Y08 and Y19.
  • Stardust: Y000, YR00, BG000, R00 and C00.
I went over the planets, lens of the telescope and the stars with a Wink of Stella clear glitter pen.

Reach for the Stars Card by April Guest Designer Jennifer Hartsgrove | Card using Cosmic Newton Stamp Set by Newton's Nook Designs #newtonsnook #handmade
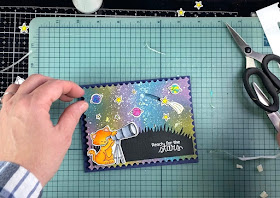
I cut grass from black cardstock and used Versamark Ink to stamp my sentiment “Reach for the Stars.” Then I heat embossed with Hero Arts white embossing powder. Next, I adhered all the elements to my card. 

Reach for the Stars Card by April Guest Designer Jennifer Hartsgrove | Cosmic Newton Stamp Set and Framework Die Set by Newton's Nook Designs #newtonsnook #handmade
I was pleased with how this version of my card turned out, I hope you all enjoy it as well!

Reach for the Stars Card by April Guest Designer Jennifer Hartsgrove | Cosmic Newton Stamp Set and Framework Die Set by Newton's Nook Designs #newtonsnook #handmade
As I said above this was my second card, the card on the bottom of this picture was my first. I didn’t care for the sentiment in the sky, I thought it popped much better on the black grass. Plus, I wasn’t pleased with the way the slider was actually sliding. So, I went back to the drawing board and fixed the areas I wasn’t happy with. I’m so glad that I did, I really love my finished card now!

Reach for the Stars Card by April Guest Designer Jennifer Hartsgrove | Cosmic Newton Stamp Set and Framework Die Set by Newton's Nook Designs #newtonsnook #handmade
I've also created a video showing you how I created this card:

Don't forget to subscribe to the Newton's Nook Designs YouTube Channel to see more great videos!

Thanks so much to Newton’s Nook Designs for having me as their April’s Guest Designer (can you believe April is almost over)?! It was such a huge honor for me to be asked, I truly love their products! They have such a wonderful group of ladies to work with, I’ve enjoyed my time immensely! 

Until next time, stay safe and keep krafting!
- Jennifer (Katahdin Krafts)

Friday, April 24, 2020

Balloon Shaker Card by Ellen Haxelmans

Balloon Shaker Card by Ellen Haxelmans | Balloon Shaker Die Set, Balloons Stencil and Frames & Flags Die Set by Newton's Nook Designs #newtonsnook #handmade

Send a Happy Wish!

Today we are sharing a gorgeous balloon shaker card by Ellen! This fun balloon themed card would for a spring Birthday greeting or just to send to a friend to lift them up!

She created a fun Balloon shaped shaker window using our Balloon Shaker Die Set. This die set includes the balloon shape as a solid shape and a frame, which makes creating shaker windows simple! The die set also includes a string for the balloon and some small confetti shapes that you can fill inside. Ellen used the small confetti shapes combined with sequins to fill her shaker. She also used the die cut word "Wish" from the same die set.

Balloon Shaker Card by Ellen Haxelmans | Balloon Shaker Die Set, Balloons Stencil and Frames & Flags Die Set by Newton's Nook Designs #newtonsnook #handmade

She used our Balloons Stencil with multiple colors of ink to create a colorful balloon background! She has some tips on how to do this technique below. The purple scallop edged frame was die cut out using our Frames & Flags Die Set.

Tips on using multiple colors on a stencil!

Below we have some tips from Ellen on how to create a fun multicolor background with a stencil:
  1. Draw all the balloons on a piece of masking paper with the help of the stencil and a pen.
  2. Cut out a square around the balloons you drew and then cut out the balloon itself. You don’t need to cut it out perfectly but not too wide.
  3. Mask off the balloons with the same size and go over it with inks
We hope you are inspired to try to create some colorful stenciled backgrounds of your own! If you do, make sure to share them with us by using #newtonsnook on instagram or posting them in our Create & Share group on Facebook!

To see more beautiful creations by Ellen, you can visit her over at her blog Crafty Ellen to see more of her beautiful creations!


Thursday, April 23, 2020

Enjoy the Little Moments Card by Samantha Mann

Enjoy the Little Things Card by Samantha Mann | Garden Mice Stamp Set and Newton Scoots By Stamp Set by Newton's Nook Designs #newtonsnook #handmade

Enjoy the Little Moments!

We hope you are having a wonderful week and taking time to enjoy the little moments in life! Today we are sharing a beautiful card by Samantha that does just that! She features the sweet image of the mouse chasing a butterfly from our Garden Mice Stamp Set. She colored the image using distress inks and cut it out with the coordinating Garden Mice Die Set to add to her card. For the card she created a beautiful purple gradient background by using distress inks over a textured woodgrain paper. She added in clouds using our Newton Scoots By Stamp Set and the coordinating Newton Scoots By Die Set. She added just a hint of gray to the inside of the clouds to help them pop! The finishing touch is the sentiment "Enjoy the little moments in life" from our Garden Mice Stamp Set, embossed in white onto a piece of vellum. That sentiment goes perfectly with the little mouse! So sweet and pretty! 

We hope that you have enjoyed this beautiful card by Samantha today! To say hello to her and see more of her amazing creations you can visit Sam over on her blog, Sam's Scrap Candy!


Wednesday, April 22, 2020

Seas the Day! Card by Amanda Wilcox

Seas the Day! Card by Amanda Wilcox | Scuba Newton Stamp Se, Purr-maid Newton Stamp Se, Gull Friends Stamp Set, Clouds Stencil and Sea Borders Die Set by Newton's Nook Designs #newtonsnook #handmade

SEAS the day!!

Today we are enchanted by this incredible card by Amanda! She has combined several fun sea themed sets to create a tall above and underwater scene that is filled with fun details!

For the underwater portion of her card, Amanda combines the fun kitty mermaid from our Purr-maid Newton Stamp Set and the scuba kitty from our Scuba Newton Stamp Set. They go so perfectly together. She also added coral, seashells and little fish from the same sets. She colored the images and used the coordinating Purr-maid Newton Die Set and Scuba Newton Die Set to cut them out. She added all these fun underwater images to a long card panel that was inked up to look like water. The wave on the top edge was die cut using our Sea Borders Die Set. On the top of the card she added in the duo of seagulls from our Gull Friends Stamp Set overlooking the underwater scene. The image was cut out using the coordinating Gull Friends Die Set. The yellow cloudy sky behind the gulls was created using our Clouds Stencil and some yellow ink. How cute!

Here are a couple of close ups so you can all the amazing details. She added white gel pen accents, glossy effects and sparkles on tail for the mermaid kitty!

Seas the Day! Card by Amanda Wilcox | Scuba Newton Stamp Se, Purr-maid Newton Stamp Se, Gull Friends Stamp Set, Clouds Stencil and Sea Borders Die Set by Newton's Nook Designs #newtonsnook #handmade

Seas the Day! Card by Amanda Wilcox | Scuba Newton Stamp Se, Purr-maid Newton Stamp Se, Gull Friends Stamp Set, Clouds Stencil and Sea Borders Die Set by Newton's Nook Designs #newtonsnook #handmade

We hope you enjoyed by this project by Amanda today! To say hello to her and see more of her awesome creations you can visit Amanda over on her blog, Twiddler's Nook!

Tuesday, April 21, 2020

World's Best Mom Card by Maria Russell

This is our second post today. To see the winners from our Send Uplifting Smiles Blog Hop, scroll down or click here
World's Best Mom Card by Maria Russell | Love Owl-ways Stamp Set, What a Hoot Stamp Set, Newton's Birdhouse Stamp Set, Essential Alphabet Die Set and Stencils by Newton's Nook Designs #newtonsnook #handmade

World's BEST Mom!

Mother's Day is just around the corner and today we have a great idea by Maria sharing how to combine several fun sets to create a unique Mother's Day card! 

She started out with the pair of owls from our Love Owl-ways Stamp Set. Although the theme of this set is valentines, these owls also work great to represent a mother and daughter! Maria colored them in browns and added eyelashes to the owl on the left so that they both have a feminine look. She added the cute duo of owls onto a branch that was stamped from our What a Hoot Stamp Set. She stamped and colored two branches and leaf clusters to cut out and add to her card. She also added a birdhouse hanging from the branch by using the image from our Newton's Birdhouse Stamp Set and cutting out just the top part of the birdhouse without using the post. Such a clever idea!

For the lovely pastel clouds in the background she used our Clouds Stencil along with several different ink colors to sponge in those soft clouds. She also added a layer of grass along the bottom using our Hills & Grass Stencil with green ink.

The finishing touch is the custom sentiment "World's Best Mom." This was created by using the words "World's Best" from our Simply Relative Stamp Set and adding the letters to spell Mom, cut out with our Essential Alphabet Die Set underneath. Having an alphabet die set like this makes it easy to customize your sentiments!

World's Best Mom Card by Maria Russell | Love Owl-ways Stamp Set, What a Hoot Stamp Set, Newton's Birdhouse Stamp Set, Essential Alphabet Die Set and Stencils by Newton's Nook Designs #newtonsnook #handmade

We hope this card by Maria has inspired you to look at your stamps in new ways and use stamps for occasions other than the ones they were meant for! 

To see more beautiful projects by Maria you can visit her over at her blog, Maria Russell Designs and don't forget to subscribe to her YouTube channel too!


Send Uplifting Smiles Blog Hop Winners!

Thank you to everyone for participating in our blog hop!

We really enjoy reading all of your comments! Look below to see if you won! 
The the winning blogs and the comments were chosen using random.org

For the first $25 Store Credit -  the winner was randomly chosen from Becky's blog: Danni


For the second $25 Store Credit -  the winner was randomly chosen from Debbie's blog:  MiamiKel

Congrats to the Winners! Don't forget - you have 7 days from today to to e-mail us at info@newtonsnookdesigns.com with your full name and email address to claim your $25 store credit! (It's easiest if you already have an account set up in our shop)

Monday, April 20, 2020

It's Your Birthday! Card by April Guest Designer Jennifer Hartsgrove


Hi Krafty Friends! I’m back up on the Newton’s Nook Designs blog and YouTube Channel today as April’s Guest Designer!

It's Your Birthday! Card by April Guest Designer Jennifer Hartsgrove | Newton's Birthday Balloons Stamp Set, Oink Stamp Set, Clouds Stencil and Confetti Stencil by Newton's Nook Designs #newtonsnook #handmade
In this weeks project I used Newton’s Birthday Balloons, and Oink Stamp Sets. Plus, I used their Confetti and Cloud Stencils. I also tried some techniques that I haven’t tried before!

Starting my project I used Pixie Spray to adhere the stencil temporarily to Bristol Smooth Cardstock. Then I randomly spread Rina K Designs Electro-Pop Neon Glitz Gels onto NND’s Confetti Stencil in Poppin’ Pink, Orange Glow, Hello Yellow and Screamin’ Green using a palette knife. I then scraped the excess off with my Stencil Pal. I did have a little difficulty with lifting the stencil off my paper, I had some tearing. I tried it several times, and wasn’t able to get one solid piece without some sort of tear. I’m not sure if I need to wait longer to remove, or if I used a little too much Pixie Spray. I was able to get what I needed for my card, and will have to do more experimenting in the future. That being said the pieces that didn’t have any damage, were absolutely gorgeous!

It's Your Birthday! Card by April Guest Designer Jennifer Hartsgrove | Confetti Stencil by Newton's Nook Designs #newtonsnook #handmade
I stamped my images onto Copic friendly Cardstock with Lawn Fawn’s Jet Black Ink. I then decided to pre-cut the images out, I wanted to use flock on my balloons and thought this would be the best course of action.

My color palette:
  • Newton’s Fur – Y35, Y38, YR15 and YR16. Ears: R20
  • Piggy: R20, R21 and R22. Hoofs: N0 and R01
  • Cake: E35 and E37
  • Green: YG06
  • Orange: YR04
  • Yellow: Y18
  •  Hot Pink: RV04

I have wanted to experiment with flock for a while, so I thought these balloons would be a cool place to check it out. I used the same colors as the Glitz Gels.


I first used Deco Foil Transfer Gel Blanco and painted it onto the “kitty” balloon. Then I waited about an hour for it to set, and added a small piece of the flock face down on the balloon. I used my household parchment paper to make an envelope and ran it through my laminator on the hot setting.


I repeated this step for each balloon using different colors. I thought the results were super cute!

It's Your Birthday! Card by April Guest Designer Jennifer Hartsgrove | Newton's Birthday Balloons Stamp Set by Newton's Nook Designs #newtonsnook #handmade
Next, I cut out two Stitched Scalloped Circle Frames from Lawn Fawn. I wasn’t sure exactly what I wanted to do with them yet. So I tried two different ideas. I ultimately decided to use NND’s Cloud Stencil with Tumble Glass Oxide Ink to make a cute sky background. I tried some Electro-Pop Neon Enamel on the outer circle, but wasn’t happy with the color combo, I decided to keep the scalloped circle white. I then trimmed three pieces of my Confetti stencil pieces to 1.25″ x 4″, looking for sections that didn’t have any tearing. I adhered them to a 5.25″ x 4″ base, leaving a little room on the top and the bottom. Then I added my circle and scalloped edge a little over the edge of the card, then trimmed off the overhang.

It's Your Birthday! Card by April Guest Designer Jennifer Hartsgrove | Newton's Birthday Balloons Stamp Set, Oink Stamp Set, Clouds Stencil and Confetti Stencil by Newton's Nook Designs #newtonsnook #handmade
Next, I added Newton in the sky, where the balloons are whisking him up, up and away. Then added the little piggy holding the cake with foam on the bottom left hand corner. I wanted some interest on my sentiment strip, so I decided to make diagonal stripes of color going across the sentiment, “It’s your Birthday.” I used foam for dimension under the sentiment as well.

When I assembled my card, I didn’t care for the empty white spaces. So at the last minute I added some coordinating colors to the spaces. I was very happy with this result. My finishing touch was to add three green rhinestones from my stash onto my card. Then I made a card base out of neon green Bazzill Cardstock, and glued my card panel to the base.


This is a much brighter project than I’m used to doing! But I love it! It was fun to dig out my laminator and learn how to flock!

It's Your Birthday! Card by April Guest Designer Jennifer Hartsgrove | Newton's Birthday Balloons Stamp Set, Oink Stamp Set, Clouds Stencil and Confetti Stencil by Newton's Nook Designs #newtonsnook #handmade
I've also created a video showing you how I created this card:

Don't forget to subscribe to the Newton's Nook Designs YouTube Channel to see more great videos!

As always, I love working with Newton’s Nook Designs products! I really can’t get enough of Newton Kitty! I can’t wait to come back next week, with another Newton creation! Thanks for stopping in, stay krafty and stay safe everyone!

- Jennifer (Katahdin Krafts)