Wednesday, October 31, 2018

Happy Halloween! Bat Card by Nakaba Rager

Happy Halloween! Bat Card by Nakaba Rager | Flying Bats Stencil and Halloween Trio Die Set by Newton's Nook Designs #newtonsnook #handmade

Happy Halloween!! 

Are you ready for Trick-or-Treating tonight?! At NND headquarters we are all set to hand out candy to the neighborhood kids! Today we are featuring a cute round Halloween card by Naki! She created this card with a fun Bat theme! She started with a circle shaped card and added purple bats over it using our Flying Bats Stencil with light purple ink! Then she added on a trio of die cut bats using our Halloween Trio Die Set. Isn't it cool how they are cut out of glittery paper!? To finish out the card she added the Trick or Treat Sentiment, die cut using the Halloween Trio Die Set too! Such a simple card but really fun for Halloween!

Thank you for the Halloween treat today, Naki! If you like this project you can see more of Naki's work  you over on her blog, Notes from Naki. Stop by and say hello!

Tuesday, October 30, 2018

Home is Where the Snow Falls Card by Holly Endress

Home is Where the Snow Falls Card by Holly Endress | Serene Silhouettes Stamp Set and various die sets by Newton's Nook Designs #newtonsnook #handmade

Home is where the snow falls!  

Are you getting in the mood for winter weather? This lovely card by Holly will help transport you to a winter wonderland! She used those fun woodland animals and birch trees from our Serene Silhouettes Stamp Set. These fun bold silhouettes are perfect for winter greetings. She trimmed them out using the coordinating Serene Silhouettes Die Set to add them into her scene. To create the scene she added some hills using our Land Borders Die Set and framed the little scene with a scallop edged frame from our Framework Die set. She also added another stitched rectangle panel using our Frames & Flags Die Set and a scalloped border edge using our Sky Borders Die Set. The sentiment  is from our Serene Silhouettes Stamp Set and was embossed in black on a banner cut out using our Frames & Flags Die Set. This card is sure to bring a smile to anyone over the winter months!

Thank you, Holly, for the beautiful card today! You can find more of Holly's creations and say hello to her over at her blog, Hollybeary Creations!


Monday, October 29, 2018

Beautiful Tags by October Guest Designer Bobbi Lemanski


Hi there! It’s Bobbi again. Today is my last post as the Guest Designer for Newton’s Nook Designs (sad face). I’ve really had fun sharing my creations with you. Since today is my last day, I thought it was only appropriate to leave by “tagging” the next guest designer and you. Tag you’re it! It’s time to get creative and get those holiday gifts, cards and tags done before you run out of time. I’ve been working on a few myself and wanted to share them with you….
Stag Tags for the Holidays
Beautiful Tags by October Guest Designer Bobbi Lemanski | Stamps and dies by Newton's Nook Designs #newtonsnook #handmade
There’s something about antlers that I find interesting and pretty. In fact, I have two on my mantel and I’m not even a hunter nor an outdoorsy, nature girl. Of course, my deer heads are more of the modern type - white and from Target! I think these tags celebrate the beauty of nature around us. 
Beautiful Tags by October Guest Designer Bobbi Lemanski | Stamps and dies by Newton's Nook Designs #newtonsnook #handmade
For the two deer tags, I used Adventure Awaits (I love that artistic deer head), Winter Memories (for the trees)  and Splendid Stags and Pines and Holly dies. For the backgrounds, I created two wood-looking backgrounds using my ruler and Copic Markers to mimic rustic boards and shiplap. I also used the “Season’s Greetings” sentiment from the new set, Ornamental Wishes. By the way, one of these deer heads is on SALE right now, and (hint) awaiting and adventure with you, too! It’s a retiring set so snag this stag before it’s gone!
Beautiful Tags by October Guest Designer Bobbi Lemanski | Stamps and dies by Newton's Nook Designs #newtonsnook #handmade
The gray tag background uses the Serene Stripes Stencil. When I turned the stencil 90 degrees and used embossing paste on it for high contrast, I saw these strong vertical lines reminding me of thin birch or pine tree trunks in the woods. I added a few pine branches from the Pines and Holly set (a must for your stash) to create the tree-like images along with a sentiment from Sentiments of the Season. A little pine cone covered in Liquid Applique adorns the sentiment band. 
These designs could easily be used for a greeting card or for Thanksgiving table place cards, too. For gifting, I plan to use them with kraft and/or a red/black buffalo plaid wrap for the holidays 

Traditional Toppers Keep the Winter Memories Alive
Beautiful Tags by October Guest Designer Bobbi Lemanski | Stamps and dies by Newton's Nook Designs #newtonsnook #handmade
The Winter Memories stamp set and dies are the star of the show for these traditional tags. The set’s silhouettes are so pretty. Combining them with softer, subtle colors of pinks, blues and greens makes for a beautiful and stunning contrast. 
Beautiful Tags by October Guest Designer Bobbi Lemanski | Stamps and dies by Newton's Nook Designs #newtonsnook #handmade


Beautiful Tags by October Guest Designer Bobbi Lemanski | Stamps and dies by Newton's Nook Designs #newtonsnook #handmade
For the first card, I created a larger shaker tag using circle dies. Shaker cards are a snap if you use the Double Sided Adhesive Foam available at Newton’s Nook Designs. To cover the outer edges of the foam on the sides of the shaker, I add double sided tape in the same width and rolled in glitter to cover. It not only finishes the edge, but it sparkles, too!  The background uses the new Evergreen Stencil with white embossing paste for dimensional snow-covered trees. I used the ornament topper from the new Ornament Shaker Die set to transform the circle shaker into an ornament. The other two coordinating tags in the same colors use many of the same sets and dies on other tags.  

Let’s Get Lit with Some Merry and Bright! 
Beautiful Tags by October Guest Designer Bobbi Lemanski | Stamps and dies by Newton's Nook Designs #newtonsnook #handmade

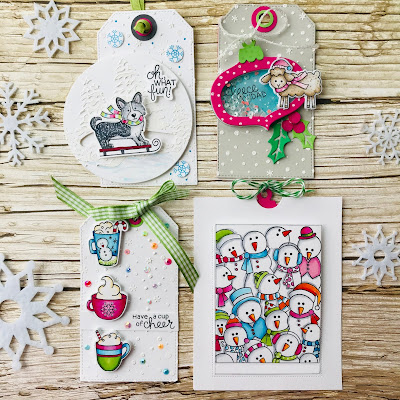
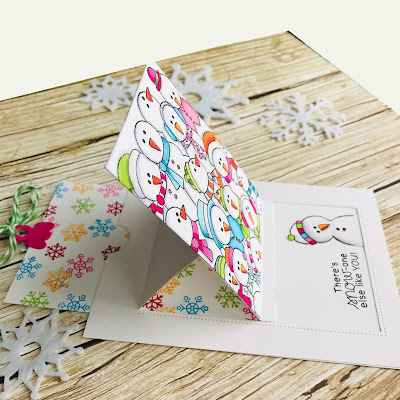
The next set of tags are merry, bright and perfect for any age!  Kids may especially enjoy their interactive features. The slider, shaker, and sliding window add to the fun! Did  you notice that I used the new Petite Snow Stencil with white embossing paste on three of the tag bases? LOVE it!  
Beautiful Tags by October Guest Designer Bobbi Lemanski | Stamps and dies by Newton's Nook Designs #newtonsnook #handmade

Beautiful Tags by October Guest Designer Bobbi Lemanski | Stamps and dies by Newton's Nook Designs #newtonsnook #handmade
I used these Newton’s Nook Designs products to complete the tags:  Winter Woofs, Frozen Fellowship, Fleece Navidad (and dies)  and Cups of Cocoa and dies along with others already mentioned. Here’s a side view of the window slider card. You can see the inside sentiment, the stamped snowflakes and the ornament topper I used for the pull tab!  
Beautiful Tags by October Guest Designer Bobbi Lemanski | Stamps and dies by Newton's Nook Designs #newtonsnook #handmade
To finish the tags, I like to cut the tag back panel in a fun accent color like pink or green to cover any bleeding from my Copic coloring from the front panel. It also makes the tag more durable under the tree, too. 
A big THANKS to Jen and Samantha for this wonderful opportunity to guest design for Newton! I love Newton’s Nook Designs and I had so much fun sharing my creations with everyone.  Thanks to all who visited and shared the kind comments with me. Happy Holidays everyone!

Now tag, you’re it! 

Friday, October 26, 2018

Happy Howl-idays Copic Coloring Tutorial Card by Ellen Haxelmans

Happy Howl-idays Copic Coloring Tutorial Card by Ellen Haxelmans | Happy Howl-idays Stamp Set and various die sets by Newton's Nook Designs #newtonsnook #handmade

Copic Coloring Dogs with Ellen

Today we have two fun coloring tutorial to share by Ellen! She's showing you step by step how she colored the two dogs from our new Happy Howl-idays Stamp Set.
Step by Step Dog Coloring Tutorial: 
Happy Howl-idays Copic Coloring Tutorial Card by Ellen Haxelmans | Happy Howl-idays Stamp Set by Newton's Nook Designs #newtonsnook #handmade
  • Picture 1 (left): I started the coloring all the clothing in red. I choose one color for all these items because it’s nicer to have matching accessories on the dogs. All the illustrations are colored from dark to lighter colors. For the reds I used the markers: R59, R39, R27 and R24. 
  • Picture 2 (center): C3, C2, C0 and 0 was used for the white in the Christmas hat and the yellow markers YR16, Y17 and YR31 where used for the bells. 
  • Picture 3 (right): I stared coloring the dog on the left side. Just like before, I color him darker colors first and layer lighter on top with E37, E35, E33 and E31. 
Happy Howl-idays Copic Coloring Tutorial Card by Ellen Haxelmans | Happy Howl-idays Stamp Set by Newton's Nook Designs #newtonsnook #handmade
  • Picture 4 (left): We’re taking it a step further and starting to give the dog texture. Staring from the shadows and spreading out I draw dots with the same colors as previous step (E37, E35, E33 and E31). The flicking technique gives him fluffy hair. To have this effect you start from the neck and draw quickly a little line to the middle of his belly. It helps me to put the stamped image upside down when I do this. I started this time with marker E51. 
  • Picture 5 (center): I draw more of the E51 marker and likewise draw flicks with the E31 and YR23 marker colors. I put darker colors on top, so it doesn’t blend so much. 
  • Picture 6 (left): For the last flicks I use the E23 and E37 markers.
Happy Howl-idays Copic Coloring Tutorial Card by Ellen Haxelmans | Happy Howl-idays Stamp Set by Newton's Nook Designs #newtonsnook #handmade
  • Picture 7 (left): The dog on the right side was colored the same way, but with other colors: E79, E77, E47 and E71 
  • Picture 8 (center): The first flicks where made with the same colors from the dog for the ears and the tail (E79 and E77) and the chest I used E37 and E35. 
  • Picture 9 (right): The last step was adding dots with all the darker brown colors from the right dog and the ending flicks with E71 for the ears and E33 and E53 for the chest. 
Once the dogs were all colored, Ellen created an awesome winter scene for them. 
Here is a close-up of the finished card:

Happy Howl-idays Copic Coloring Tutorial Card by Ellen Haxelmans | Happy Howl-idays Stamp Set and various die sets by Newton's Nook Designs #newtonsnook #handmade
She used the coordinating Happy Howl-idays Die Set to cut out the dogs before adding them to her card. This die set has the added bonus of cutting out the space between the dogs so you can see the scene behind them. To create her scene, Ellen used our Petite Snow Stencil with white embossing paste over a fun blue distress inked sky. She added snow drifts using our Land Borders Die Set and Sea Borders Die Set to create layers of white. She added those lovely silhouetted trees on each side of the dogs using the pines from our Forest Scene Builder Die Set. To finish out the card she added a banner with the Happy howl-idays sentiment, die cut using our Frames & Flags Die Set

Happy Howl-idays Copic Coloring Tutorial Card by Ellen Haxelmans | Happy Howl-idays Stamp Set and various die sets by Newton's Nook Designs #newtonsnook #handmade
I hope you enjoyed this card by Ellen today and learned a few tips about coloring dogs! 

If you love this project by Ellen you can visit her over at her blog Crafty Ellen to see more of her beautiful creations!

Thursday, October 25, 2018

Oh My Gourd Card by Samantha Mann

Oh My Gourd Card by Samantha Mann | Newton's Pumpkin Patch Stamp Set and Essential Alphabet Die Set by Newton's Nook Designs #newtonsnook #handmade

Oh My Gord!

This card by Samantha will make you laugh! She created this adorable card using that big image of kitties and pumpkins from our Newton's Pumpkin Patch Stamp Set. Isn't it so pretty how she colored the pumpkins in shades of orange and pink? Then she fussy cut out the image so she could add a stripe of washi tape behind it! For her sentiment, she created her own custom sentiment using letters that were die cut from black with our Essential Alphabet Die Set to spell "Oh My Gord"! What a fun way to send a silly Fall card!

Thank you Samantha for the fun smiles today! To say hello to Samantha and see more of her awesome creations, you can visit Samantha's Blog, Sam's Scrap Candy!


Wednesday, October 24, 2018

Merry & Bright Card by Juliana Michaels

Merry & Bright Card by Juliana Michaels | Forest Scene Builder, Holiday Greetings, Land Borders and Snow Globe Shaker Dies by Newton's Nook Designs #newtonsnook #handmade

Merry & Bright! 

Today Juliana created a lovely winter wonderland using our new die sets to create a lovely winter scene! She used the birch trees and birds from the new Forest Scene Builder Die Set to frame each side of the scene. In the center she added the sentiment "merry & bright" using words from our new Holiday Greetings Die Set. For the snowy hills along the bottom she used our Land Borders Die Set. Then she finished it out using snowflakes from our Snow Globe Shaker Die Set. What a creative way to combine all those lovely die cut shapes!

To see more details on her project and say hello to Juliana today, visit her blog, 17 Turtles!


Tuesday, October 23, 2018

Merry Christmas Sloth Cards by Maria Russell

Merry Christmas Sloth Card by Maria Russell | Slothy Christmas Stamp Set by Newton's Nook Designs #newtonsnook #handmade

Merry Christmas!

Today we are sharing TWO gorgeous Christmas cards by Maria! She featured our adorable new sloth from our  new Slothy Christmas Stamp Set. On the first card she colored the sloth with copics and cut him out using the coordinating Slothy Christmas Die Set. Then for her card she made a lovely snowy background and it's a shaker card too, filled with lots of sparkly confetti!
Merry Christmas Sloth Card by Maria Russell | Slothy Christmas Stamp Set by Newton's Nook Designs #newtonsnook #handmade
Across the top she added bunch of tiny stockings that were cut out using our Ornamental Shaker Die Set. In the corner she added a trio of pine trees using our new Forest Scene Builder Die Set. For the sentiment she used the big die cut Merry from our new Holiday Greetings Die Set and combined it with the stamped "christmas" from our Snow Globe Scenes Stamp Set.

Maria created a second awesome card today too:
Merry Christmas Sloth Card by Maria Russell | Slothy Christmas Stamp Set by Newton's Nook Designs #newtonsnook #handmade
She used the adorable sloth image from the Slothy Christmas Stamp Set a second time, this time perching him onto a fun slider card! She colored him again with copics and this time she added some fun sparkle to his hat! She cut him out using the coordinating Slothy Christmas Die Set. Then she surrounded him with branches that were cut out of white with our Pines & Holly Die Set. When the card slides up, it reveals the fun sentiment, "a little holiday cheer" that was stamped using our new Ornamental Wishes Stamp Set. So fun!
Merry Christmas Sloth Card by Maria Russell | Slothy Christmas Stamp Set by Newton's Nook Designs #newtonsnook #handmade
To see more beautiful projects by Maria, visit her over at her blog, Maria Russell Designs and don't forget to subscribe to her YouTube channel too!

Monday, October 22, 2018

No Whining – Just Good Wine Here Cards by October Guest Designer Bobbi Lemanski


Hi there! It’s Bobbi Lemanski, the October guest designer for Newton’s Nook. Today, I’m sharing some cards using the stamp set, Wine A Little along with a few other sets. You certainly won’t hear any whining from me, because I loved working with this flavorful wine set!  
An Aging Wine is a Fine Wine!

Wine Card by October Guest Designer Bobbi Lemanski | Wine A Little and Beautiful Leaves Stamp Sets by Newton's Nook Designs #newtonsnook #handmade
Figure 1: Card features Wine a Little and Beautiful Leaves stamp sets and dies.

My first card pairs Wine a Little (and dies) and Beautiful Leaves (and dies) stamps sets together. Using purples, pinks and reds, I watercolored the background on Canson XL watercolor paper, mimicking the look of spilled wine. The leaves and wine images were colored using Copic Markers in colors that “age” the look of the bottles and their labels. 

Wine Card by October Guest Designer Bobbi Lemanski | Wine A Little and Beautiful Leaves Stamp Sets by Newton's Nook Designs #newtonsnook #handmade
Figure 2: A watercolor background mimics the look of spilled wine.

This card has an amazing color vibrancy from the watercolors that contrasts well with the gray-tones of the leaves. No perfection needed here…. spilled wine is good wine in this case!

Book Club Gal Pals

Book Club Wine Card by October Guest Designer Bobbi Lemanski | Wine A Little and Classy Teachers Stamp Sets by Newton's Nook Designs #newtonsnook #handmade
Figure 1: An oversized wine bottle, glass and cork makes fun of the amount of wine consumed at book club.

When I hear wine, I immediately think of my book club gals in my town. These amazing ladies love reading lots of books and drinking fine wine while we discuss each book. This card was completely inspired by them. The phrase from the set was perfect for this idea.

Book Club Wine Card by October Guest Designer Bobbi Lemanski | Wine A Little and Classy Teachers Stamp Sets by Newton's Nook Designs #newtonsnook #handmade
Figure 2: Combining two sets can create humorous and unique card ideas.

I used the lovely ladies in Classy Teachers and Holding Happiness to represent the book club gals. With a few minor modifications to the cake lady (in HH), I was able to create a gal holding a tray of books to go with the two gals from Classy Teachers. I created room for them to gather in using a few lines and a ruler.

Book Club Wine Card by October Guest Designer Bobbi Lemanski | Wine A Little and Classy Teachers Stamp Sets by Newton's Nook Designs #newtonsnook #handmade
Figure 3: Personalize your message with a white gel pen on a black chalkboard.

I love the idea of personalizing the chalkboard with any message. Think of all the things you can do with Classy Teachers! Even if your handwriting is less than perfect, don’t worry. A chalkboard is meant to be a little messy and imperfect (look at mine!)

Wine a Lot… Like a Million, Billion, Zillion!

Wine Card by October Guest Designer Bobbi Lemanski | Wine A Little and Thankful Thoughts Stamp Sets by Newton's Nook Designs #newtonsnook #handmade
Figure 2: Alcohol Inks on a transparency sheet create an artistic window.

My next card combines Wine a Little stamp set and dies with the Thankful Thoughts phrase set. One of the phrases in the set says, Thanks a million, billion…etc. I loved the idea of showing lots of gratitude not only in the words, but in the images (as you will see in the inside), too.

Wine Card by October Guest Designer Bobbi Lemanski | Wine A Little and Thankful Thoughts Stamp Sets by Newton's Nook Designs #newtonsnook #handmade
Figure 3 Wine a Little  stamps and dies were used to embellish the front.

I also used “You’re the best!” from Thankful Thoughts and “Here’s to you!” from Cocktail Mixer. Sequins accented the images from Wine a Little on the front.
Wine Card by October Guest Designer Bobbi Lemanski | Wine A Little and Thankful Thoughts Stamp Sets by Newton's Nook Designs #newtonsnook #handmade
Figure 4 Stacks of wine bottles visually portray the huge amounts of gratitude expressed in words.

I wanted to portray the huge amount of gratitude in the images to match the phrase, so I stacked the wine bottles up to create a wall of bottles in the inside that could show through the window.

The window is covered with an alcohol-inked transparency sheet I created. I find working with alcohol inks to be fascinating. I love how the red and pink inks mixed and blended on this one. I also used Alcohol Lift Ink from Ranger to remove the ink to match the design underneath. By placing the transparency sheet over the cardstock (I put the cardstock piece in a bag to protect it), I matched the bottles and lifted the ink.  You can see it here in this photo with the light capturing the lifted design. It allowed the images stamped in the inside of the card to really show through from the front.  

I’ll have another set of cards to share next week. I raise my wine glass to Newton’s Nook for these great sets and to you, for joining me today! 

Bobbi Lemanski                                                         

2018 Cat Lovers Hop

2018 Cat Lovers Hop

This week is the 2018 Cat Lovers Hop! This hop is so fun and since the theme is CATS we knew we HAD to play along! To participate in this blog hop, you just have to create a project that features a cat and upload it to the post on Her Peaceful Garden! You totally should play along if you can since there are some really awesome sponsors and prizes, including one from us at Newton's Nook Designs

Here's what I created:
Cat Lovers Blog Hop | Caroling Cats card by Jennifer Jackson | Caroling Newton Stamp Set by Newton's Nook Designs #newtonsnook #handmade
We JUST had our Holiday release last Friday and so I wanted to share a card I created using our brand new Caroling Newton Stamp Set. This set has stolen my heart with the trio of cute little caroling kitties and it's SO fun to color! For this card I stamped the image onto watercolor paper and I colored the kitties using Zig Watercolor Markers. It's so fun to try making different shading and patterns on the kitties! Then I cut out the image using the coordinating Caroling Newton Die Set. The die even cuts out the little spaces between their heads!  
Cat Lovers Blog Hop | Caroling Cats card by Jennifer Jackson | Caroling Newton Stamp Set by Newton's Nook Designs #newtonsnook #handmade
Once the kitties were ready to go I needed to make a scene for them. I started with a light blue background and inked those music notes onto it using our new Music Stencil with distress ink. Then I cut out a snowy hill using the stitched curve from our Land Borders Die Set. I added in a little green tree using the new Forest Scene Builder Die Set too. Then I finished it off by embossing the "meow to the world" sentiment onto a little black banner that was cut out using our Frames & Flags Die Set.  The finishing touch was a bit of twine across the snowy bottom and then I mounted it to a darker blue card base. 
Cat Lovers Blog Hop | Caroling Cats card by Jennifer Jackson | Caroling Newton Stamp Set by Newton's Nook Designs #newtonsnook #handmade

If you haven't seen this set yet, here's an image of it: 
You can find it for sale here: Caroling Newton
Caroling Newton Stamp Set by Newton's Nook Designs #newtonsnook #handmade
We have LOTS of other cute kitty stamps too! 
Make sure to check them all out here in our Newton Category

I hope you will play along with the Cat Lovers Hop!  Newton, our sweet orange kitty, definitely approves of this hop!! Have you met Newton yet? If you haven't, here's a quick pic of him! He's the inspiration for many of our cat themed stamps and the namesake of our company!  You have until Oct 27th to link up at Her Peaceful Garden for a chance to win prizes! 


Friday, October 19, 2018

Holiday Release NOW AVAILABLE + Winners from October Reveal Days!

Are you ready to get your paws inky with our new products?

Winners from the blog hop are posted below - scroll down to see if you won

Our new products are now available at newtonsnookdesigns.com

Plus - we just added a coordinating die sets for our popular Sun Soaked Christmas Stamp Set!
also now available at now available at newtonsnookdesigns.com


October Blog Hop Winners!

Thank you to everyone for participating in our blog hop. We really enjoy reading all of your comments! Check out below to see if you won! The blogs and the comments were chosen using random.org.

Winner of the Winter Memories stamp set from the Newtons Nook Design's blog: Connie


Winner of The Nutcracker Squeak stamp set from Juliana's blog: Mel H


Winner of the Caroling Newton stamp set from Tatiana's blog: Paula

Winner of the Holiday Stockings stamp set from Larissa's blog: Katie Ann Brooks


Winner of the Ornamental Wishes stamp set from Maria's blog: Kirsty Vittetoe


Winner of the Slothy Christmas stamp set from Zsofia's blog: Avra


Winner of the Happy Howl-idays stamp set from Samantha's blog: Dayna Audirsch


Congrats to the Winners! Don't forget - you have 7 days from today to to e-mail us at info@newtonsnookdesigns.com with your full name and mailing address and the name of the set you won to claim your prize (it's also easiest if you already have an account set up in our shop)

You can shop online now - our new release is up in the store!