Tuesday, July 31, 2018

A Birthday Trio by Holly Endress

A Birthday Trio by Holly Endress | Holding Happiness Stamp Set and Confetti Stencil by Newton's Nook Designs #newtonsnook #handmade

A Trio of Fun for a Big Birthday Wish!  

This birthday card by Holly is three times the fun! She used all three lovely ladies from our Holding Happiness Stamp Set on this gorgeous birthday card today! She colored each of the girls with their fun big items and cut them out using the coordinating Holding Happiness Die Set. She then layered them onto her card over a colorful base layer that was created using our Confetti Stencil along with some cheerful colored inks! To finish it off she added the "big wishes" and "for your birthday!" from the Holding Happiness Stamp Set, stamped onto banners cut out using our Frames & Flags Die Set


A Birthday Trio by Holly Endress | Holding Happiness Stamp Set and Confetti Stencil by Newton's Nook Designs #newtonsnook #handmade

Thank you, Holly, for the lovely card today! You can find more of Holly's creations and say hello to her over at her blog, Hollybeary Creations!

Monday, July 30, 2018

Shadow Box Card by July Guest Designer Milene Tiberius


Hi friends! Welcome to the NND blog and to my last blog post as a guest designer. I have a fun shadow box card to share with you today. I created this card after watching Jennifer McGuire’svideo (Thank you, Jennifer!). This is such a cool technique and very versatile, too. It allows you to create a card that folds flat, but turns dimensional when popped open.

Shadow Box Card with Dogs by July Guest Designer Milene Tiberius | Woof Pack Stamp Set by Newton's Nook Designs #newtonsnook #handmade

Here is a photo to give you an idea of what this design looks like:

Shadow Box Card with Dogs by July Guest Designer Milene Tiberius | Woof Pack Stamp Set by Newton's Nook Designs #newtonsnook #handmade

I started out by heat embossing the large dog image from the Woof Pack Stamp Set. I stamped it on a piece of Bristol Smooth cardstock and used my Tombow markers to watercolor the puppies and background. I had so much coloring these dogs! The Chihuahua on the top row was colored to look like my own. When the watercoloring was good and dry, I added glossy accents to the noses of the dogs and to some of their accessories. You could also add whiskers to them all. I think that would be so fun! Just be sure to add all the details before assembling the card together. I then set this piece aside to dry and started working on the card base.

Shadow Box Card with Dogs by July Guest Designer Milene Tiberius | Woof Pack Stamp Set by Newton's Nook Designs #newtonsnook #handmade

I used the following Tombow markers: N15, 020, 133, 177, 565, 772, 800, 879, 912, 942, 969, 977, 990, 992 and 993.

Shadow Box Card with Dogs by July Guest Designer Milene Tiberius | Woof Pack Stamp Set by Newton's Nook Designs #newtonsnook #handmade

The card base was created using a heavy weight gray cardstock. I also chose some pattern paper to help me decorate the inside of my card – from the Lawn Fawn Knock On Wood and Let’s Polka In The Meadow paper packs. I wanted the card front to be simple, so all I did was add some white ink blending to the card base. I carefully inked only the circles from the Starfield Stencil. I thought that the stars would be too much for this design. I die cut a rectangle window on the inside panel, so that you would be able to see the dogs. That will create the shadow box affect.


Shadow Box Card with Dogs by July Guest Designer Milene Tiberius | Woof Pack Stamp Set by Newton's Nook Designs #newtonsnook #handmade

There is some very precise measuring and scoring to create this design. If you would like to see the full instructions, I suggest you watch Jennifer McGuire’s video. I think the process gets much easier once you see it come together. However, you will need very basic supplies to be successful. 

Remember that you can use this idea with just about every type of card!
Moving on, I white heat embossed the sentiment for my card front and added a few die cut hearts. I coated it all using glossy accents, for dimension and shine. I wanted my personal message to be “hidden”, so I added a piece of white cardstock to the back of the card. That is where I will write my message and sign.


That is it for me today! I hope you enjoyed my card for this week and that you will try this technique. Can you imagine all the possibilities?! Head on over to the Newton’s NookDesigns shop to stock up on cute images and get creating!

The month of July has been such a joy for me. I am very grateful for the opportunity to share my work with you. Thank you Newton’s Nook team for having me here throughout July! I am excited to see what’s to come from all of you.

Hope you have a great day!

Friday, July 27, 2018

Under the Sea Card Duo by Ellen Haxelmans

Under the Sea Card Duo by Ellen Haxelmans | Message in a Bottle, Narly Mermaids, and Vitamin Sea Stamp Sets  and Seashell and Tropical Fish Stencils by Newton's Nook Designs #newtonsnook #handmade

Under the Sea Cards

Today we have two amazing under the sea themed cards by Ellen using our some or our new summer products combined with our Message in a Bottle Stamp Set! She's created such clever combinations of products!
Mermaid and Narwhal card by Ellen Haxelmans | Message in a Bottle and Narly Mermaids Stamp Sets and Tropical Fish Stencil by Newton's Nook Designs #newtonsnook #handmade
For her first card Ellen used the mermaid hugging the narwhal from our Narly Mermaids Stamp Set. She colored the image with vibrant colors (love the yellow tail) and cut it out using the coordinating
Narly Mermaids Die Set. Then she colored the scroll from our Message in a Bottle Stamp Set and combined it with the sentiment from the Narly Mermaids Stamp Set. She used the Message in a Bottle Die Set to trim it out.  For her background she created an awesome stenciled area of sparkly fish using our Tropical Fish Stencil with glittery paste. This panel was mounted onto a scallop edged teal colored panel that was cut out using our Framework Die Set.
Vitamin Sea card by Ellen Haxelmans | Message in a Bottle and Vitamin Sea Stamp Sets and Seashells Stencil by Newton's Nook Designs #newtonsnook #handmade
For her second card Ellen used the big bottle image from our Message in a Bottle Stamp Set and stamped the image inside it from our new Vitamin Sea Stamp Set! So cute! She cut colored everything in fun ocean colors and cut out the bottle and cork using the Message in a Bottle Die Set. For her background on this card she use our Seashells Stencil to create a fun seashell pattern. Again, she mounted the stenciled panel onto a scallop edged orange colored panel that was cut out using our Framework Die Set.

Aren't these ocean themed cards so awesome? It is so neat how you can combine so many of our products together to create unique cards! I hope you are inspired to see what sets you have in your collection that you could use together!

To see more of Ellen's beautiful creations, you can visit Ellen over at her blog Crafty Ellen!

Thursday, July 26, 2018

Mew Home Card by Samantha Mann

Mew Home Card by Samantha Mann | Newton Loves Boxes and Snowglobe Scenes Stamp Sets by Newton's Nook Designs #newtonsnook #handmade

New Home Card with Kitties!

Do you know anyone who is moving or just purchased a new home? This card by Samantha is perfect for just that occasion! She created  this adorable card using the image of the two cute kitties snuggled inside a box from our Newton Loves Boxes Stamp Set. She colored them using watercolors and then fussy cut them out to add to her card. She also stamped the cute little rows of houses from our Snow Globe Scenes Stamp Set and colored them in fun bright colors with watercolors. She fussy cut the houses out and layered them behind the sentiment "congrats on your new home" from our  Newton Loves Boxes Stamp Set. Then she added the kitties in front with some dimensional tape. She also created the fun pawprint background using our Pawprints Stencil! This card would be so perfect for a new homeowner who also loves kitties!

Thank you Samantha for making us smile today! To say hello to Samantha and see more of her awesome creations, you can visit Samantha's Blog, Sam's Scrap Candy!

Wednesday, July 25, 2018

A Llama Fun Birthday Card by Juliana Michaels

A Llama Fun Birthday Card by Juliana Michaels | Loveable Llamas Stamp Set and Serene Stripes Stencil by Newton's Nook Designs #newtonsnook #handmade

Have a llama fun!

This celebratory birthday card by Juliana is so cheerful and fun! The duo of llamas on this card was created using our Loveable Llamas Stamp Set. The lamas in this set come with lots of accessory options and Juliana dressed them up in rainbow colored blankets and sunglasses, and then added on some birthday gifts too! She used the coordinating Loveable Llamas Die Set to cut out all the pieces and combine them together.  For the colorful background she die cut out the postage edged panel using our Framework Die Set and then stenciled over it using our Serene Stripes Stencil! Isn't it so cool how she masked areas of the stencil so she could apply different rainbow colors to each horizontal stripe!? I love the colorful results!

To see more details on her project today, make sure to visit  Juliana over on her blog, 17 Turtles!

Tuesday, July 24, 2018

Life is Better in Flip Flops Card by Maria Russell

Life is Better in Flip Flops Card by Maria Russell | Flip-Flop Life Stamp Set by Newton's Nook Designs #newtonsnook #handmade

Flip-Flops in Every Color!

Today we are sharing this cheerful summer card by Maria! She used our adorable new 2x3 mini Flip-Flop Life Stamp Set and created six colorful pairs of flip-flops for her card, using a different bright and summery color for each pair! She cut out all those adorable shoes with the coordinating Flip-Flop Life Die Set. Then she added them onto a white card base, nesting each pair inside a circle. (The circle panel was created using a die cut from another brand). She finished off her card by embossing the sentiment from the Flip-Flop Life Stamp Set in white on a black banner! Such a perfect summer card!

Life is Better in Flip Flops Card by Maria Russell | Flip-Flop Life Stamp Set by Newton's Nook Designs #newtonsnook #handmade

To see more beautiful projects by Maria, visit her over at her blog, Maria Russell Designs and don't forget to subscribe to her YouTube channel too!


Monday, July 23, 2018

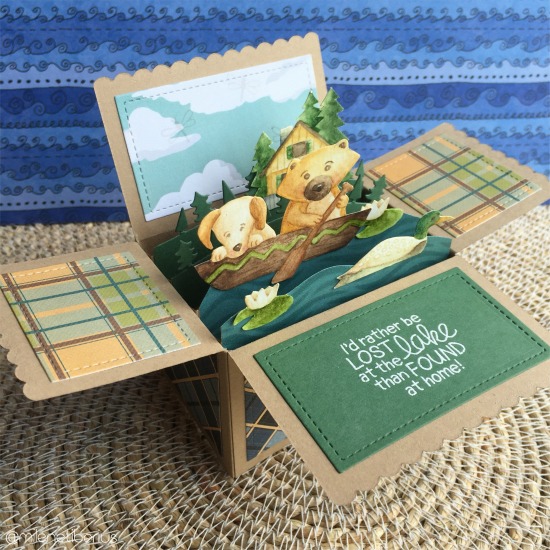
Lost at the Lake Pop-up Box Card by July Guest Designer Milene Tiberius


Hi everyone!

I am back to share a fun pop up box card with you! I love going to the lake, and that has been my favorite thing to do this summer. I wanted to create a project that would recreate the feeling of a warm, wonderful day out by the water. The Winston’s Lake House Stamp Set is perfect for lake lovers and outdoor adventurers. This set is amazing for creating masculine cards, too!
Lost at the Lake Pop-up Box Card by July Guest Designer Milene Tiberius  | Winston's Lake House by Newton's Nook Designs #newtonsnook #handmade
I chose to do a pop up box card because it would be a great gift for my in-law family that lives by the lake. This type of project also makes it easy to create complex scenes, without much effort.
I started out by die cutting all of my pieces, stenciling and heat embossing. That will help you get situated. I used the “Lawn Fawn Box Pop Up” die set to create the base and to decorate the flaps of my box. I chose a craft cardstock on the thicker side for the box itself and pattern paper to decorate it. I chose some beautiful prints from the “Carta Bella The Great Outdoors” 6x6 paper pack for the plaid, sky and water. Having designs from the same paper pack will help you mix and match your patterns, but still have a cohesive look. I also used a solid green cardstock that I had in my stash for the tree lines and sentiment panel. 
Lost at the Lake Pop-up Box Card by July Guest Designer Milene Tiberius  | Winston's Lake House by Newton's Nook Designs #newtonsnook #handmade
I ended up not using the black stamped images, but I will be saving them for another project.
I wanted the lake water to have more detail than being plain blue, so I decided to use the Waves Stencil over the pattern paper. I ink blended Weathered Wood Distress Ink over the stencil, and trimmed it out by hand. I made sure to follow the shape of the waves when trimming it out. I white heat embossed the sentiment on the green panel and assembled my box together. I prefer having the pop up box complete before adding the stamped images and final details.
Lost at the Lake Pop-up Box Card by July Guest Designer Milene Tiberius  | Winston's Lake House by Newton's Nook Designs #newtonsnook #handmade
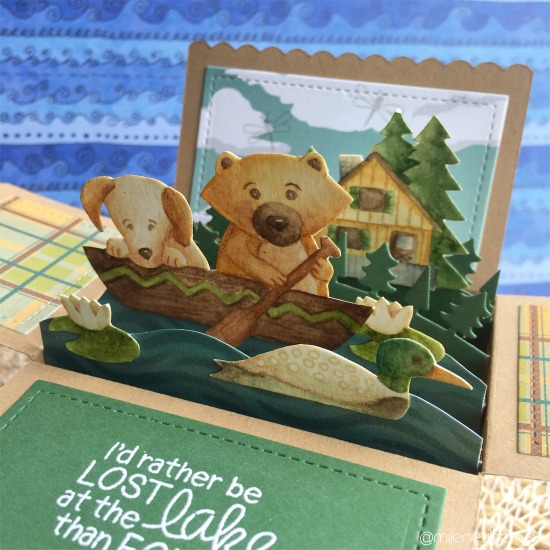
I decided to watercolor my images using the no-line technique. To achieve that look, I stamped my images using Antique Linen Distress Oxide ink. I initially stamped and colored more than what I used on my card, but I was not able to fussy cut it all. If you were to use the coordinating dies, I am sure you would be able to add more elements. I, however, didn’t particularly want the white borders for today’s project. I wanted it to look more realistic, if possible. The colors I used to watercolor my images were inspired by the pattern paper I picked out.
Lost at the Lake Pop-up Box Card by July Guest Designer Milene Tiberius  | Winston's Lake House by Newton's Nook Designs #newtonsnook #handmade
Looking at the close ups you will be able to see the log cabin that is a little hidden in the back of the scene. I also added the large image of the canoe, the duck and two of the lilly pads. I also stamped the dragonfly image about three times on the sky piece. You would certainly see them flying around at the lake! I glued all of my watercolored images to my card using liquid glue. Be sure to hold them in place for a few seconds so that they are secured well.
Lost at the Lake Pop-up Box Card by July Guest Designer Milene Tiberius  | Winston's Lake House by Newton's Nook Designs #newtonsnook #handmade
Although this box has so much dimension, it folds perfectly flat to fit in an A2 size envelope. You could even add more decoration to the outside of the box, but I wanted to keep it more masculine and simple.

I initially stamped my images in black ink, then in brown ink and then in the light Oxide ink. I spent a lot of time deciding what would work best for this card. If I had known that no-line is what I wanted from the beginning, I would have this project put together very quickly. Pop up boxes may seem complicated, but I promise you they’re not!
Lost at the Lake Pop-up Box Card by July Guest Designer Milene Tiberius  | Winston's Lake House by Newton's Nook Designs #newtonsnook #handmade

Thank you for stopping by and I will see you next week for my final share as the July Guest Designer!
Milene 

Blog Hop Winners

5 year Anniversary Blog Hop Winners!

Thank you to everyone for participating in our blog hop. We really enjoy reading all of your comments! Check out below to see if you won! The blogs and the comments were chosen using random.org.

The following four winners each will receive a $25 store credit to newtonsnookdesigns.com

Winner 1 of a $25 store credit was chosen from Stephanie's blog: Dee Earnshaw

Winner 2 of a $25 store credit was chosen from Zsofia's blog: Dana M


Winner 3 of a $25 store credit was chosen from Larissa's blog: Lisa's Creative Niche

Winner 4 of a $25 store credit was chosen from the Kimberly's blog: Debra Rumpza


Winner 5 of a $25 store credit was chosen from Naki's blog: Karthikha


Congrats to the Winners! Don't forget - you have 5 days from today to to e-mail us at info@newtonsnookdesigns.com with your full name and email address to claim your prize (it's also easiest if you already have an account set up in our shop)

Have you seen our NEW 2x3 Mini Stamp Sets? You can see the five new designs here

Plus, Now through July 27, You can get your choice of 1 MINI Stamp Set FREE with a $60 purchase or 2 FREE with a $100 purchase! One week only at newtonsnookdesigns.com


Friday, July 20, 2018

Newton's Nook Designs 5 YEAR Celebration Blog Hop!


Newton’s Nook Designs is so excited to be celebrating our FIVE Year Anniversary
- WOW - That's five whole years of getting our 
paws inky!

I remember how excited I was when our first four sets came in the mail over five years ago! Now we have over 350 products in our shop! It's been an Incredible journey so far- filled with happiness, stress, lots of excitement and very little sleep! Here are a few behind the scenes photos from this last year of Jeff and I and our little helpers, Newton and Hobbes!
5 Year celebration | Newton's Nook Designs #newtonsnook
We want to take a minute to say THANK YOU to all our fans, designers and customers who helped make it happen! We are so happy to be here and we can't wait to see what the next year brings!

To celebrate, we have a blog hop and we've invited some very special guests to our hop along with us today! Make sure to scroll down to the end of the post to see the whole list and leave them some sweet comments for a chance to win prizes (details at the end of this post)

Every stop on the hop is sharing cards made with our new products and I made a card to share today too!
 Flip-Flop Card by Jennifer Jackson | Flip-Flop Life Stamp Set by Newton's Nook Designs #newtonsnook #handmade

For my card today I used our new 2x3 sized Flip-Flop Life Stamp Set! Those adorable little flip-flops are so fun to color in bright colors! I created two pair for my card and cut them out using the coordinating Flip-Flop Life Die Set.  

 Flip-Flop Card by Jennifer Jackson | Flip-Flop Life Stamp Set by Newton's Nook Designs #newtonsnook #handmade

For my card base I cut out layers of sand using our Land Borders Die Set with kraft cardstock. For the water, I used our Waves Stencil with some embossing paste that I tinted blue for a tone-on-tone effect! I layered it all onto the card and added the sentiment from the Flip-Flop Life Stamp Set, embossed in white on a banner cut out using our Frames & Flags Die Set.

I hope you enjoyed this project. Make sure to visit all the blogs listed below for more fresh inspiration today! Don't forget to check out our new release too. All the items are now available at
newtonsnookdesigns.com! Plus, we're having a sale this week where you can get one or two of our adorable new 2x3 stamp sets for FREE with purchase:

Celebrate with us and enter to win!

To celebrate 5 years Newton's Nook Designs is giving away a $25 store credit to spend in their online shop to 5 lucky winners!

Here's how to win:
Comment on the NND Design Team and Special Guest blogs (see list below)! The winner will be chosen at random from the collective blog hop posts. Make sure to check out each of their blogs and comment for your chance to win. You will not know which blog has been chosen so the more you comment on the better your chances are of winning! You have until Sunday, July 22 at 9pm EST to comment. Winners will be announced on NND blog post on Monday, July 23 and will need to contact us to claim their prize so make sure you check back to see if you've won!

Special Guests:

Newton's Nook Design Team:

July Release NOW AVAILABLE + Winners from July Reveal Days!

Are you ready to get your paws inky with our new products?

Winners from the blog hop are posted below - scroll down to see if you won

Our new products are now available at newtonsnookdesigns.com
And don't forget to grab our NEW mini stamps too!

Plus we're having a week long special on the new mini stamps! 
Spend $60 and get your choice of 1 MINI Stamp Set FREE or spend $100 and choose 2 FREE MINI stamp Sets! 
only at www.newtonsnookdesigns.com

Happening Today -
Check out our 5 Year Celebration BLOG HOP  
for a chance to win more prizes! 

Winners from the July Reveal blog days!

Thank you to everyone for participating in our new release reveal days! We really enjoy reading all of your comments! Check out below to see if you won! The blogs and the comments were chosen using random.org.

The following four winners each will receive a $20 store credit to newtonsnookdesigns.com


From Reveal Day 1 - the winner of the $20 store credit was chosen from Juliana's blog: Leanne


From Reveal Day 2 - the winner of the $20 store credit was chosen from Samantha's blog: Dawn Wolf

From Reveal Day 3 - the Winner of the $20 store credit was chosen from Ellen's blog: Tracy


From Reveal Day 4 - the Winner of the $20 store credit was chosen from Maria's blog: DANNSCRAFTINGWHIMS
Congrats to the Winners! Don't forget - you have 7 days from today to to e-mail us at info@newtonsnookdesigns.com with your full name and email address to claim your prize (it's also easiest if you already have an account set up in our shop)

You can shop online now - our new release is up in the store!