Today we have another fun interactive project to share by Ellen! Each month she is sharing an interactive project one week after our new release!
Today is she's sharing how to make than amazing layered scene in a card:

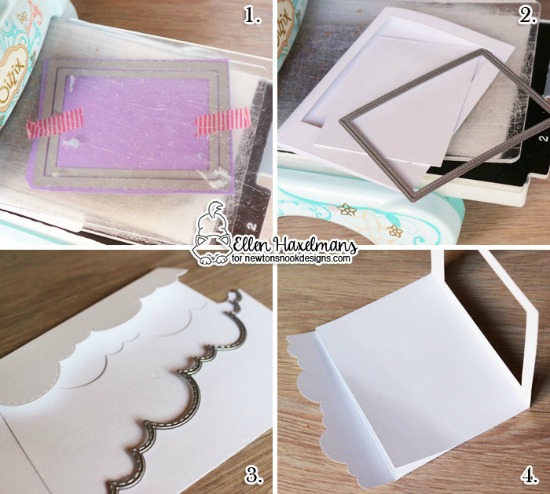
Step one: Die cut the biggest scalloped square from the Frames & Flags Die Set out a colored paper. Also cut a square out of the rectangle so you get a frame.
Step two:
Cut also a rectangle in the middle of your card base.
Step four: Glue the sides (that didn’t get any cut) from the two card-bases on top of each other.
Step five: Cut out of the transparency the scalloped rectangle and glue it on top of your frame from the card base. On top of the transparency you glue down the frame from step one.
Now that you have the card layers, you can create your scene any way you would like! For the inside panel of her card today, Ellen created a lovely purple sky and added in a hill using our Land Borders Die Set and a row of houses from our Snow Globe Scene Stamp Set in the far background. then she added in some taller trees from the Fox Hollow Stamp Set and the cute Easter Egg and kitty image from the Newton's Easter Basket Stamp Set. Then she finished it off with some lovely grass cut out using our Land Borders Die Set.
On the front panel of the card she layered another tree from the Fox Hollow Stamp Set, some Easter eggs from the Newton's Easter Basket Stamp Set and that cute bunny from the Bitty Bunnies Stamp Set on top of the transparency window!
Here is a little video from Ellen where you can see how all the layers come together to make the fun interactive card!
If you love this project by Ellen you can visit her over at her blog Crafty Ellen to see more of her beautiful creations!


Love this scene! Awesome colors and details! Love Newton and that cute bunny!
ReplyDeleteThank you so much for this kind comment Denise. I really think you should try and also make a card like this.
Deletethis is awesome card!
ReplyDeleteAnd you are way too sweet 😘
Delete