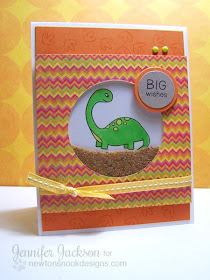
Ready for another tutorial? When I started playing with the dinosaur stamps from the Prehistoric Pals Stamp set - I was trying to think of things that would be fun to make with it and almost immediately I thought of making a fun shaker card with some sand and the dinosaurs! I thought I'd take photos as I made the card and share it as another tutorial.
Here's what you need:
- Stamps
- Paper
- Ink & coloring supplies
- Foam mounting tape
- transparency sheet or acetate
- sand
- Circle die
- Various paper
Step One: Stamp & color image. You can choose any type of stamp to create this card but we'd love it if you used one of our images from the Prehistoric Pals stamp set which is now for sale at newtonsnookdesigns.com. For my card I picked the Brontosaurus image. I stamped him in black and colored him with Copic Markers.
Note: You want to make sure your cardstock is at least a 1/2" larger than your image on all sides to make room for the foam tape.
Step Two: Add Foam Tape. You need to use some thick foam mounting tape to make a "frame" around your image. I had this in my box of adhesives so I don't remember exactly where it's from but I think It's just a 3M mounting tape that you can get at any big box store. You just need to us something that's thick and has sticky on both sides. Make sure you line up your tape at the corner so that there aren't any spaces for your sand to get out. For now, leave the top liner on the tape.
Step Three: Add Sand. You don't need very much. I used less than a spoonful. The sand is from the floral department of the craft store. If you don't want to use sand you could definitely use something else... beads, sequins, or anything small like that! After you have your sand in place you can very carefully pull off the tape liner.
Step Four: Add Transparency Sheet. Cover the whole thing carefully with a piece of acetate or transparency sheet (found at office supply stores). It's kind of hard to see in the photo but it's on there...
Step Five: Cut Circle for Top. Now You get to decide what the front of you card looks like. I found this fun Chevron paper in my stash and decided it would be perfect. I cut it to be slightly larger than my dino piece and then used a circle die in my Big Shot to cut out a circle. You could also do a square but just make sure that the shape is a little smaller than the inside edge of your foam tape frame - you don't want that to show through...
Here's how mine looked after I added on the top layer!
So- what do you think of the shaker tutorial? Have you been inspired to create you own?


i love that shaker card idea!! and using sand is genius!! SO fun!! i totally want to make one now!!
ReplyDeleteWhat a cute idea!!! Thanks for sharing :)
ReplyDeleteThank you for sharing your tips and techniques! I've never been comfortable making a shaker card but you've made it look easy. Fab card too! ;)
ReplyDeleteThis is GREAT! I made my first shaker card, actually, for my post TODAY on my blog!I wish I had seen THIS first, though!
ReplyDelete